Chains of
Promathia Mission Distant Beliefs
Phomiuna Aqueducts
Notice:
Thank you for taking the time and reading my guide. It will no
doubt help you with this extremely difficult quest. All information
here is provided by Dak of Seraph, and is intended for this page
only. All information borrowed will be linked to at the bottom
of the page. |
This
mission is begun by talking to an old man at the top of Tavnazia
and then entering the Aqueducts on the bottom floor. This area
is EXTREMELY dangerous because it's capped at level forty but
the monsters range from forty up to level fifty and almost always
keep in groups. Before you begin check that you have the following
things:
- Stack(s)
of Holy Waters for dispelling Doom.
- Five
or six hi-potions if you're melee.
- Three
Yagudo drinks, and five or six hi-ethers if you're a mage.
- Bronze
Key which is dropped off the Fomor enemies withing the Aqueducts.
If you don't have one a thief can pick the lock with tools.
- One
stack of silent oils
- Icurus
Potion for emergencies
Attacks
you should watch out for while fighting the Taurus family:
- Back
Swish: a frontal AE attack with the tail that deals a fair
amount of damage.
- Triclip:
A combo attack that targets one person and does a bit more
damage than Back Swish.
- Mow:
A large AE attack that does about as much damage as Back Swish.
- Mortal
Ray: The bane of your existence. This is a gaze attack and
can be avoided by turning around. Once you're hit you must
spam Cursna or Holy Waters because one might not do the trick.
Three of four might not do the trick as well. You have ten
seconds before you die.
Party/alliance
set-up per party:
- Paladin
- Warrior/Samurai/Beast
Master/Monk
- White
Mage
- Ranger
- Black
Mage/Summoner
- Red
Mage/Summoner
Yea
I'm a Dragoon and I didn't include myself. I made it easy on myself
and have leveled War/Nin to fourty just for these quests. A Dragoon
could easily help complete this quest, but there are just too
many AEs for the Wyvern to keep up with. There are situtations
where you really can't Spirit Link to save your Wyvern because
you'll end up killing yourself.
Beastmasters can help with link control, as
well as use their pet to tank for a little bit. Samurai's two-hour
is useful for the Minotaur as well as the Monk's. Ninjas with
Utsusemi: Ni can help tank in emergiencies but don't offer much
damage. Thieves aren't in their prime here because monsters move
around a lot from tank to tank and would easily succumb to AEs,
and I wouldn't suggest bringing a Dark Knight for the same reasons.
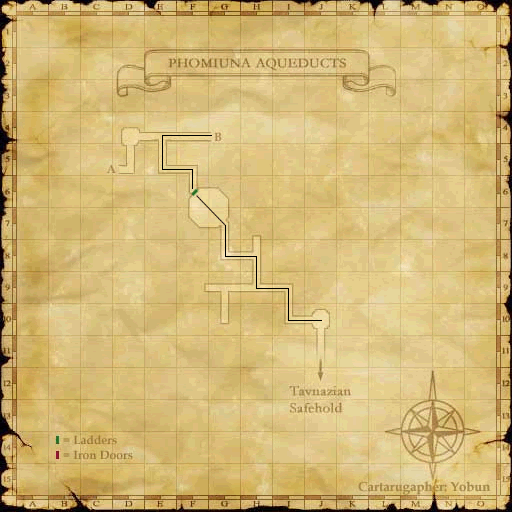
Traveling through Phomiuna Aqueducts can be
simple or it can be hard. Sticking together in a group ensures
you'll be able to take down something if it attacks. When taking
the necessary risks all players should be at attention and ready.
If somebody is attacked STOP and return to take it down. If you're
attacked and linked do your friends a favor and die in an easy
to tractor/raise area. This first map is easily navigated and
ranges from Tough to Incredibly Tough.
|

You'll
encounter a Fomor Summoner and Fomor Monk past the first turn.
They'll be incredibly tough and have strong weapon skills and
area effect spells. They, along with the gloops, attack to sound
so sneaking is essential. As you reach the first large room you'll
find Tough Taurus, up to three, wandering around. These bad boys
have True Sight which means they attack to sight and can see through
invisible. Luckily for you they don't have eyes in the backs of
their heads so walking behind them is incredibly easy. Climb the
latter and you'll find large spider monsters that are not aggresive.
Follow the path into the second map. |

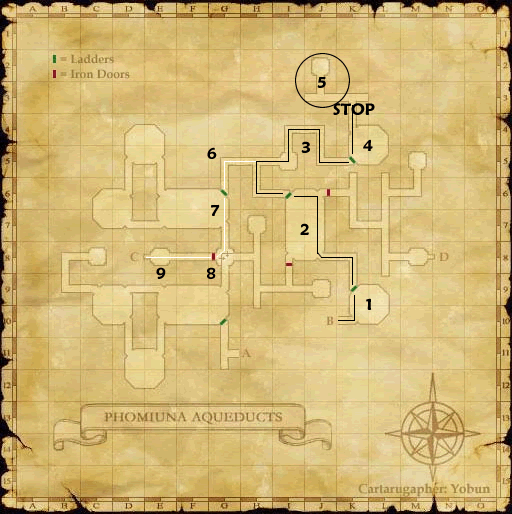
1.
You'll find yourself at another large room with Stegotaurs. They're
the same as Taurus but a lot harder. If you find yourself fighting
one keep it's attention in a direction away from the rest of your
party or alliance.
2. This is a large room with
a Fomor Dragoon and Fomor Ninja, two or three Stegotaurs, Makara,
and Oil Spills. Everything but the Makara are agressive. You can
only walk around the sides and across a bridge in the center.
You should sneak up and attempt to run behind the Stegotaurs,
or just fight them if there's only one in your way.
3. You'll find a single Stegotaur
in this tunnel so rest up before stumbling into him.
4. Another large room where
Stegotaurs and Fomor roam. When you reach the word STOP it is
advised that you STOP. Anywhere beyond that tunnel is open season
on your butt because the Minotaur is located within the circle
and warps all parties near if you go any further. This attack
also does damage to the entire party.
5. Rest up, and rest up good.
This is an incredibly challenging fight where half my alliance
died fighting. The Minotaur's melee attacks can be avoided with
Blink, but it spams Mow which is an AE attack and drops all shadows.
It is advised that you have set tanks that will turn around after
they provoke for hate. The other tank can then deal damage until
they gain hate again. You'll definately use your two-hour abilities
here, and bring an alliance. This is where you'll need all those
items I suggested earlier with the exception of the bronze key.
Once he's dead RUN AWAY. I cannot stress how it important it is
to return to the tunnel where you stopped at. The respawn time
on the Minotaur is about five minutes and will pull you all back
in.
Unfortunately the Bst was scouting out for pets
when he came too close. He wasn't anywhere near the spawn but
it pulled the entire alliance in anyways. If you're a Bst, there
are no monsters here other than the Minotaur so two-hour and grab
a spider before attacking. The tanks pulled hate and turned around
to avoid Mortal Ray. I, a War/Nin, did my damage dealing act while
the black mages and rangers did theirs. It doesn't have the world's
greatest defense, as even I was taking chunks of damage out of
this thing. At around half health it spammed Mow and took most
of us out. The ranger used her two-hour ability and saved the
day. We raised our fallen and decided to leave. Half way out he
respawned and pulled us back in and killed us all. Bummer.
After defeating the Minotaur follow back on
the black path to the white path which will take you through the
second half of the quest.
6. You'll find a lone Stegotaur
waiting here.
7. This is another large room
with Fomor and Stegotaurs. Wait until it's clear and follow the
path to eight.
8. Do NOT drop down. As you
can see it only leads back to the first map. You'll need a Bronze
Key or a Thief with tools at this point. Beyond the door is another
Stegotaur. Enter and pull him back to the door.
9. You'll find three Fomor
here waiting for you. They don't move so sneak up and run past
them to the ladder. It'll trigger a cutscene, after which climb
the latter into map three.
|

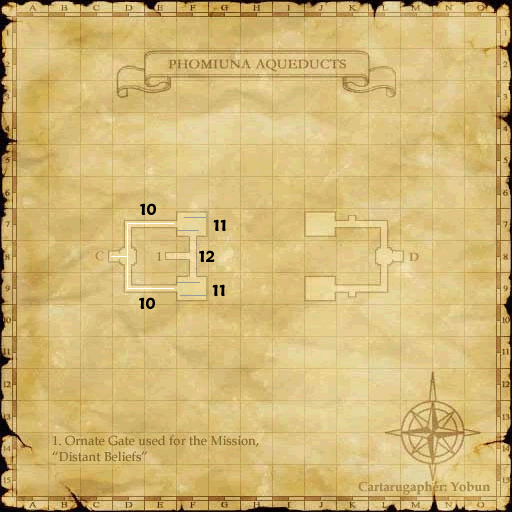
In
the next room you'll find two doors on either side of you. It
can be a bit annoying here because two Stegotaurs wait for you
at both location tens. You must enter either location eleven and
find a ??? which will open the door to location twelve. You'll
find one ??? in each room along with three or four Fomor, but
only one switch will open the door so it might be trial and error.
Once inside you're safe and the oil lamps closest to the doors
will open them if you need to let people on the other side inside.
When you check the lamps they'll let you know
what element they are, and you'll have to check two lamps at the
same time. You'll need to check the lamp that corrosponds to the
current day, and the lamp with the element that is weak to the
current day. Remember to press them at the same time.
| Day |
Corresponding
Lamp |
| Earth |
Lightning |
| Fire |
Ice |
| Ice |
Wind |
| Lightning |
Water |
| Water |
Fire |
| Wind |
Earth |
| Light/Dark |
Dark/Light |
Once
through you're home free. Enjoy a cutscene, then return to Justinius
inside Tavnazia. Congratulations!
All
information was provided and written by Dak.
Maps of Phomuina Aqueducts were found on Killing
Ifrit courtesy of Yobun.
|
|
