Notice:
All material here is copyright their original owners where indicated.
All other content is copyright Dak of Seraph and is intended for
this page only. Sites with material borrowed from will be linked
to at the bottom of the page. |
|
Notice
II: This will be incomplete until I have finished all warrior artifact
armor quests. I could just copy and paste from other sites, but
to be as comprehensive as possible I will require my own experiences.
I will also try to keep everything as spoiler free as possible. |

| To start the
quest obtain level forty and talk to Phara in Bastok Mines outside
of the residential area (J-9). She asks for sword leather and doesn't
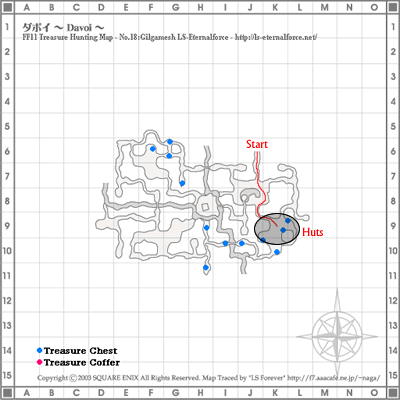
give a very good description of where to find it. Travel to Davoi
and find the area located below. |

There will
be several huts and monsters that will check as easy prey or decent
challenges, and a hut flap location switching around between them.
When you're party is ready check the hut flap and two notorious
monsters will spawn, Barakbok and Gavotvut. Barakbok is a dark knight
type monster, while Gavotvut is a warrior type. After defeating
them find the tent flap and check it again for the sword leather.
For the fight you'll need a black mage variant with sleep and elemental
seal so you can take them down one at a time. A white mage or somebody
who can heal is also necessary, and monk, ranger, or dark knight
to deal the damage. They'll need to be level fifty or above to be
safe, unless you've got a lot of back up. Either you or whoever
else you invited will be tanking.
Bring it back to Phara and wait a Vanadiel day to talk to her again.
Bring the weapon to her son Naji who is outside the president's
office in the Metalworks to receive your reward. Be sure to return
to talk with Phara or Deidogg will ignore you for artifact quest
two.
I've had two
experiences with this, one with two japanese players helping a warrior
that thought I wanted to come along for the ride, and one with a
huge alliance of level sixty+ players. In the first fight, the a
galka white mage tanked Gavotvut while the paladin tanked Barakbok.
The two of us just attacked until the fight was over and they left
without realizing I needed it too. The second time came when I was
waiting around with seek up, and I was invited to the alliance by
a higher leveled warrior who knew the pains of the artifact quests.
They were originally there for paladin and bard artifacts. The monsters
were just slaughtered.
Top.
|

To start this
quest, finish The Doorman and be sure you've
talked to Phara to end it then find Deidogg at (H-6) down Ore Street
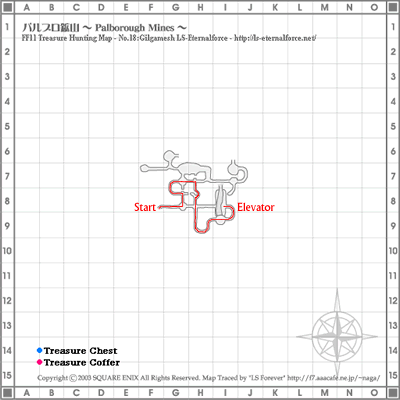
in Bastok Mines. After much talk he asks you to head to Palborough
Mines and defeat a notorious monster and bring back the item he
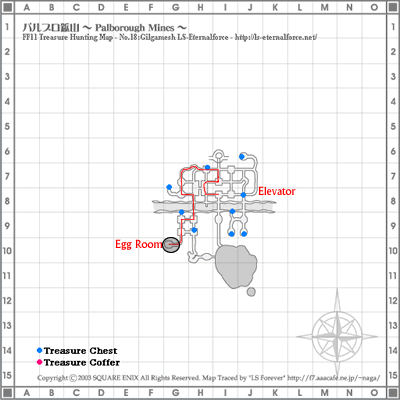
drops. Find the mines and follow the path below.
|


Clear out
all quadavs so they don't link. At this point they'll all be too
weak when checked and will pose no threat at all, but it helps if
they aren't meddling. Check the ??? point located on the shelf of
eggs and Nickel'Ghu Nestfender will appear.
You'll need a white mage for some major healing, and a tank. The
tank can either be a paladin or monk, because you'll be doing some
average damage; your help should be level fifty-five+. Nickel'Gu
has a lot of health and above average defense. This fight will be
a long one but relatively easy, because it mainly involves maintenance
and upkeep of tanker. Nickel'Gu will use protect three, and many
other defense skills, as well as shoulder bash and ore toss.
Once defeated he drops a mottled quadav egg, which you should quickly
lot on and obtain. Head back to Deidogg and trade him an item. Another
galka will come along and tell a story. He brings up and item and
it'll send Deidogg into his own little flashback. He'll then talk
about the parasite skin, then leave you with an open ended quest.
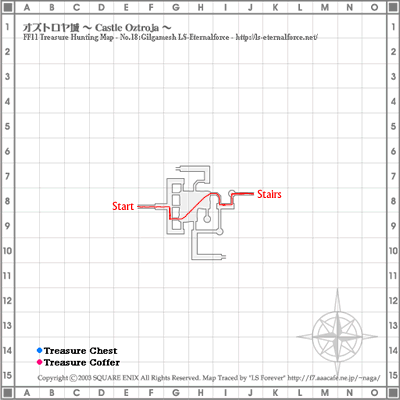
Head to Oztroja castle with some prism powders and a healing friend.
Find your way to the area below.
|


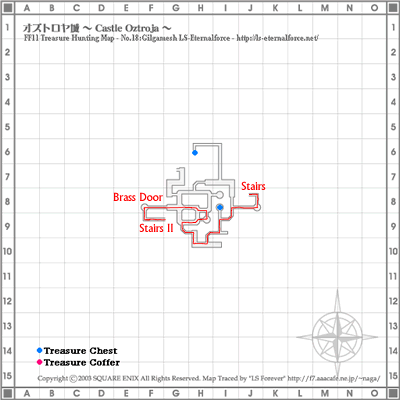
Find your
way to the large brass door on the second floor. It'll have four
switches and two yagudo guards which will check as easy prey at
level fifty. With a healer you might be able to take them, if not
wait for somebody to open the door then thank them. Run, run, run,
and don't stop because you'll be with some incredibly tough monsters.
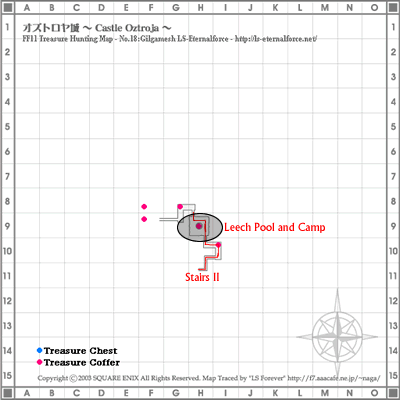
Once near the leech pool you'll want to camp on either side in the
hallway. From my experiences the yagudo don't walk close enough
to spot you in there, but be very careful anyways. You may even
want to use a couple prism powders while idling. The leeches will
check as decent challenges at level fifty, but you should already
know it'll be much harder.
To pull, cast invisible and wait for a leech to separate itself
from the rest and run up to the edge until you hear it make a noise
then run back as fast as you can. If it hits you invisible is down
and you'll be in trouble. Using your 2hr won't help if you're trying
to solo it. It'll use TP Drainkiss which will kill your chances
at using weapon skill, and just help him use his. Soloing it will
be easier at level fifty one and fifty two. If you've elected to
bring a healer with you just have them heal you and it'll all be
fine. When you're done, get out of there with escape, warp II, or
a scroll of warp because it'll be impossible to get out of that
door if it isn't already open.
Bring the parasite skin back to Deidogg, and he'll have a flashback
which you'll be seeing too. He'll tell you to come back in a Vanadiel
day for your reward.
Nickel'Gu was
definitely easy, but also long. I had a white mage healing, a paladin
tanking, and a bard with some power ups, all level fifty-six+. I
just did all the damage I could, and was able to use Berserk and
Warcry twice in the fight.
After wondering around Oztroja using up a whole stack of prism powders
trying to find the leeches I realized I had to leave using my one
prism powder left. I was looking around the altar room for the pool,
but I was way off. After wandering around aimlessly I found the
brass door and realized what was behind it. I returned to Jeuno
to grab some more prism powders and returned to wait outside the
door.
Somebody eventually came along and waited for me to use the prism
powder before he opened the door. I found my way to the pool, and
camped in the hallway on the other side. I recasted invisible, pulled
a leech, and engaged him in the hallway. I used my two hour ability,
and found myself dead with an almost defeated leech. The same person
who opened the door found me and raised me; he turned out to be
a level fifty-eight thief subbing white mage. I asked him to help
and he agreed. He buffed and I pulled and we gave that leech a beat
down for the record books.
Top.
|

This quest
also requires the completion of The Doorman.
This will probably be the hardest quest of your warrior career.
I don't have a map of Behemoth's Dominion but the directions are
easy, and the map is small.
First, talk to Deidogg again for a little message. Next walk a little
further down the street and talk to Ditzo for a cut scene about
a cookie. Trade a ginger cookie to Deidogg to start up this quest.
Somehow you'll need to find a full alliance of level 55+. Each party
in the alliance should have a tank, a healer, a refresher, and anything
else a normal party would have since you're fighting three goblin
notorious monsters. If you can't gather the amount of people necessary,
you may use the command /sea BehemotDom every once in a while to
find out when the Behemoth campers are there, be there when they
are, and beg them to help.
Behemoth's Dominion in located on the other side of Qufim down a
long cave. When you zone in you'll find that everything attacks
on sound, and everything is aggressive. You'll need to make your
way to (K-9) and find a ??? point. Clear out everything in the immediate
area, and spawn the three goblins:
Doglix Muttsnout, White Mage type.
Picklix Longindex, Thief type.
Moxnix Nightgoggle, Ranger type.
They can and will all use their two hour abilities, which means
Doglix will use Benediction. Be sure to concentrate all power on
Doglix first while the other tanks tank the other two. Be sure to
cast Barfire/fira before the fight starts because they will toss
a whole lot of bombs.
After the fight is over, check the ??? again, and zone out for a
cut scene. Congratulations! The hard part is over.
I was able to include myself in another warrior's party to complete
this because he had an extra space open. We killed everything around
the spawn point, and built up some TP. We dropped it all on Doglix
hoping he wouldn't use Benediction, but he did and we had to drop
some more weapon skills on him to take him down. The ranger eagle
eyed a Red Mage when he used convert, and the thief used his two
hour ability while a paladin was tanking him before we even got
around to killing it. We had two Summoners use their two hour abilities,
and three White Mages with Benediction to use. We got bombed a lot,
and basically fought it out until the end. It was tough.
Top.
|

This quest
also requires the completion of The Doorman,
and requires you to be level fifty.Head on over to the Upper Jeuno
armor shop and talk to Guslam. After that you'll need to grab a
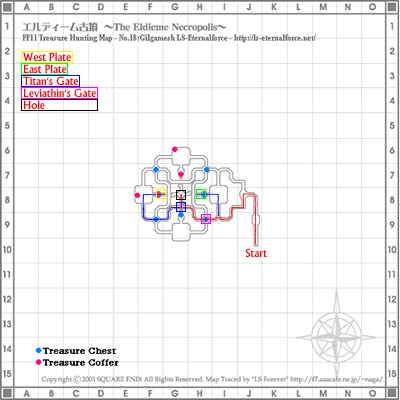
party of ~50-60 and head to Eldieme for coffer key hunting. Eldieme
can be very confusing and dangerous so follow the map below, and
you'll NEED SNEAK. |

As you can
see this map is very colorful, but for a very good reason. Following
the usual red path can be hindered by doors that open and close,
which are toggled by plates in the four main rooms. You'll need
a runner with sneak to toggle them. The rooms are referred to by
their direction on the compass. The blue routes are to be taken
as you pass them. The East Plate will open up the Leviathan's Gate
but close Titan's Gate. You'll reach Titan's Gate, and need to toggle
the West Plate to close Leviathan's Gate, and open Titan's Gate.
Once inside Titan's Gate, there's a switch that will toggle the
gates like the plates, so switch it once to let your person pass
through Leviathan's Gate, and again to open Titan's.
Just incase you didn't understand that:
1) Reach Leviathan's
Gate.
2) Toggle East Plate.
3) Reach Titan's
Gate.
4) Toggle West Plate.
5) Party toggles
switch inside Titan's Gate.
6) Party toggles
it again when the runner returns to Titan's Gate.
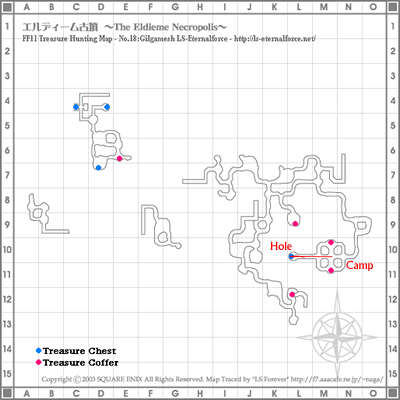
You'll reach a hole in the center of the map, and drop down to the
map below.
|

This can be
either easy or hard. You have a short run into a room that has no
spawns whatsoever, BUT an element does travel through the room from
time to time. You have to be very aware of the changing weather
and where the element is.
You'll find Tomb Mages and Tomb Warriors that drop the coffer keys
you're looking for in the halls surrounding, and further in. Your
puller will need sneak the whole time, and it's best that they either
be a summoner or bard. Summoners can have carbuncle attack the monster
while they run back to camp, then release the summon. The monster
will find your camp with no link. Bards can sleep the monster, and
pretty much the same will happen.
Coffer spawns are on the maps as pink dots. As you can see two spawn
near you, so you can camp there if you want, it might be the safest
place. Find a coffer, open it, and you'll receive a glove type item.
Bring the gloves back to Guslam, and he'll be unable to repair them.
Find Yin Pocanakhu in the Tenshodo HQ and she'll have some info
on a toolbox, but you'll have to pay her one thousand gil. Pay her,
and find the box in Port Jeuno outside the item shop. Now you'll
be asked to bring back a Dark Flame.
This is pretty simpler, but can also be very, very, dangerous. Throw
together a party, and Teleport-Vahzl, or run to Xarcabard through
Ranguemont and Beaucedine Glacier. Bring somebody who's done it
before, because I have no maps of the areas surrounding the castle.
It should be easy to put together a party because everybody needs
to fight this notorious monster.
Once in Xarcabard head east to the large rays of light shining up
from the ground. Through the whole run you'll want sneak, and you'll
need to dodge around the flying eyes. The demons will attack on
sight, and the eyes will attack on sight and sound. Climb the hill
and cross the bridge into Castle Zvahl Baileys.
|

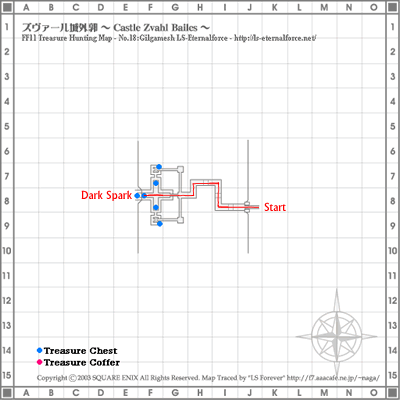
You should
be able to run through tearing everything apart because the demons
link like madmen. Be warned, that dark elements spawn here, so watch
out. They shouldn't pose much of a threat, but can be hazardous.
Once you reach the central open areas, BE WARNED: there is a pit
around the area you walk upon, and it's filled with demons. You
won't know it when it happens, but will realize that you've linked
dozens of demons when they suddenly turn the corner and attack you.
The best strategy is stay in the center, and fight in the center.
You'll most likely link them all, but don't run that'll make it
a lot worse. Stay and fight because it's not that tough.
Once everything is clear, head over to the four torches. Activate
one, and Dark Spark will appear. Take him down, and click on the
EXACT same torch. You'll all receive a Dark Flame which you'll take
back to the toolbox to receive your Fighter's Mufflers.
My party teleported into Xarcabard and made our way into the castle.
We fought our way through, and linked the demons in the pits twice.
One of our red mages died twice. The Dark Spark fight was very easy,
and when we were done we teleported to Holla and returned to Jeuno.
Top. |

This quest
requires the completion of Borghertz's Warring
Hands, and is pretty simple. You'll probably find a coffer key
while leveling on helm beetles, but they are also dropped off Wespes.
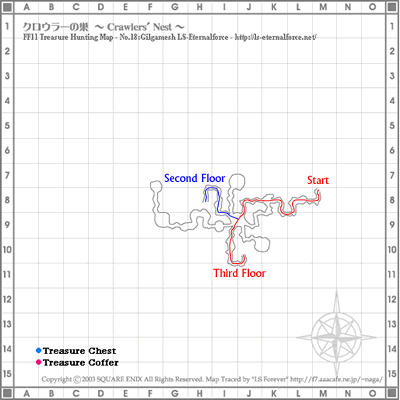
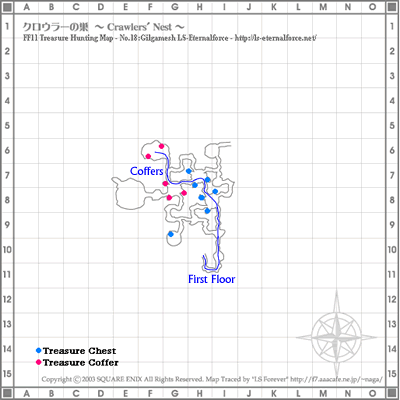
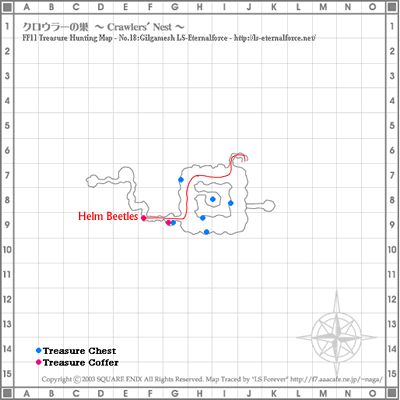
You'll need to find the 'Rumbler Room' by following the route below. |


You'll need
sneak to get past the exorays, soldier crawlers and scorpions, and
invisible to get past the beetles that run around the donut shaped
room. From the thin hallway you can pull helm beetles or rumbler
crawlers. You'll most likely already know of this room.
After getting the coffer key from the helm beetles you can wait
in that tunnel for two safer to camp coffer chests, or you can head
back out and take the blue route to the other five which are very
dangerous to camp. If you camp the two by the rumblers, you'll find
rumble crawlers surrounding one spawn, and a single rumbler that
spawns occasionally by the other. There should be parties there
most of the time, so it may be safe to camp between them in the
center of the tunnel.
If you go for the coffers on the second floor you'll need sneak
and invisible. The lizards and crawlers there attack on sound, and
the wespes attack on sight. Soldier crawlers spawn and fill the
whole room with the three coffers, and flies control the room with
two. Wespes are dispersed through the tunnels connecting them.
Get the key, and open the chest, and you'll receive the Fighter's
Mask. If you have a treasure key you should also look out for a
treasure chest, they can drop valuable items or gil.
I got a coffer key while leveling on helm beetles, and found the
coffer while leveling on helm beetles. It couldn't have been any
easier.
Top. |
| The
maps were obtained at the linkshell EternalForce's web site, here.
Artifact armor graphics were obtained from Playonline's site,
here. |
|

